Table of Contents
- OAK-D: Understanding and Running Neural Network Inference with DepthAI API
- Introduction
- Configuring Your Development Environment
- Having Problems Configuring Your Development Environment?
- Project Structure
- Introduction to DepthAI
- DepthAI Software Stack
- DepthAI API
- Pipeline
- Device API
- Connection
- Messages
- Node
- EdgeDetector
- XLink
- XLinkOut
- NeuralNetwork
- MobileNetDetectionNetwork
- YoloDetectionNetwork
- YoloSpatialDetectionNetwork
- DepthAI SDK
- Understanding the DepthAI API Pipeline
- OAK Demo Examples
- Summary
OAK-D: Understanding and Running Neural Network Inference with DepthAI API
In this tutorial, you will learn the core concepts of DepthAI API and leverage it to run a few Deep Learning and Computer Vision applications on the OAK-D device.
This is the 2nd lesson in our 4-part series on OAK-101:
- Introduction to OpenCV AI Kit (OAK)
- OAK-D: Understanding and Running Neural Network Inference with DepthAI API (today’s tutorial)
- OAK 101: Part 3
- OAK 101: Part 4
To learn how DepthAI API works and run neural network inference on OAK-D, just keep reading.
OAK-D: Understanding and Running Neural Network Inference with DepthAI API
Introduction
In our previous tutorial, Introduction to OpenCV AI Kit (OAK), we gave a primer on OAK by discussing the Luxonis flagship products: OAK-1 and OAK-D, becoming the most popular edge AI devices with depth capabilities. We also discussed the OAK-D Lite variant of OAK-D that was launched in the second Kickstarter campaign having a smaller weight and form factor but with the same Spatial AI functionality as OAK-D.
Given that you followed our first tutorial, you would be well aware of the OAK family and variants like Lite, Pro, and Compute Module (CM), offered with USB and PoE connectivity. The highlight of the tutorial was discussing around ten different applications that can be run on OAK devices ranging from image classification to object detection to human keypoint estimation.
Today we will dive deeper into the internals of the OAK device and understand the architecture and components of the DepthAI API, which gives the host the power to connect, configure and communicate with the OAK device. We will unravel the magic inside DepthAI API that allows various computer vision and deep learning applications to run on the OAK device.
Finally, we will run a few computer vision and deep learning examples on the OAK-D device using the pre-trained public models from the OpenVino model zoo. We believe this would be a great way to get your hands dirty with the DepthAI Python API and practically understand through code what happens underneath the hood of an OAK device.
Configuring Your Development Environment
To follow this guide, you need to have the OpenCV and DepthAI library installed on your system. Also, we highly recommend you follow the Luxonis Installation Guide, which covers the installation process for different platforms in detail. In today’s tutorial, the host platform is a macOS system, and if you also happen to use a macOS platform, then run the bash command mentioned here before you install the Python packages.
Luckily, both OpenCV and DepthAI are pip-installable:
$ pip install opencv-python
$ pip install depthai
Having Problems Configuring Your Development Environment?
All that said, are you:
- Short on time?
- Learning on your employer’s administratively locked system?
- Wanting to skip the hassle of fighting with the command line, package managers, and virtual environments?
- Ready to run the code right now on your Windows, macOS, or Linux system?
Then join PyImageSearch University today!
Gain access to Jupyter Notebooks for this tutorial and other PyImageSearch guides that are pre-configured to run on Google Colab’s ecosystem right in your web browser! No installation required.
And best of all, these Jupyter Notebooks will run on Windows, macOS, and Linux!
Project Structure
We first need to review our project directory structure.
Start by accessing the “Downloads” section of this tutorial to retrieve the source code and example images.
From there, take a look at the directory structure:
├── main.py
├── models
│   └── mobilenet-ssd_openvino_2021.4_6shave.blob
├── pyimagesearch
│   ├── __init__.py
│   ├── color_camera_preview.py
│   ├── config.py
│   ├── left_right_mono_camera_preview.py
│   ├── object_detection_mobilenet.py
│   └── utils.py
├── requirements.txt
└── results
    ├── color_camera.png
    ├── mono_camera.png
    └── object_detection.png
In the pyimagesearch directory, we have:
config.py: The configuration file for the experimentsutils.py: The utilities for the object detection pipelinecolor_camera_preview.py: Holds the code for running the color camera feedleft_right_mono_camera_preview.py: For testing the stereo camera pairs of OAK-Dobject_detection_mobilenet.py: The object detection code for running the neural network inference on OAK-D
In the core directory, we have four scripts:
models: A directory that contains the mobilenet object detection model inblobformatrequirements.txt: The Python packages that are required for this tutorialresults: It contains experiments outputmain.py: The main Python driver script that would allow you to run one of the three tasks
Introduction to DepthAI
DepthAI is a Spatial AI platform that allows machines to perceive the world like humans can understand what objects or features are and where they are in the physical world (and not just in pixel space). Its goal is to combine and optimize five key attributes: Deep Learning, Computer Vision, Depth perception, Performance (e.g., running high-resolution frames and FPS (Frames Per Second), use of multiple sensors), and Low Power Embedded solutions.
DepthAI platform is built around a Neural Network accelerator called Intel Movidius VPU, a Myriad X chip capable of performing 4 trillion operations per second. It combines depth perception with neural network inference through an easy-to-use Python API.
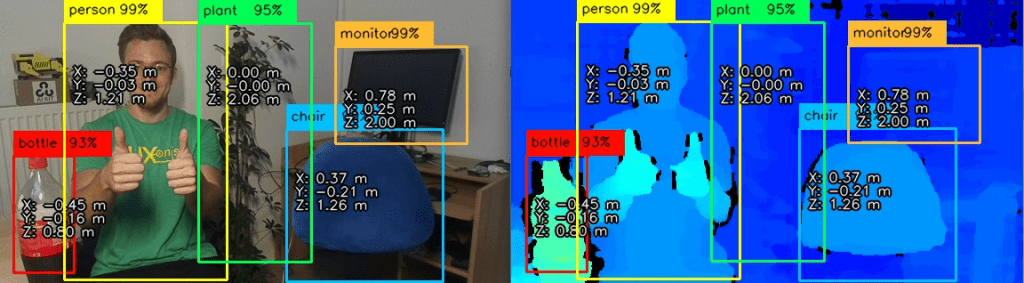
DepthAI is a complete ecosystem of custom hardware, firmware, and software API. Best of all, it is modular, and you can integrate this technology into your products. Figure 2 shows an example of DepthAI, which fuses AI capabilities with depth perception, basically object detection with each object’s depth information (estimating spatial coordinates, i.e., XYZ).
Most of these terms you read in the above paragraphs are already addressed in our previous tutorial, Introduction to OpenCV AI Kit (OAK), so we recommend you check that post if you haven’t already.
In today’s tutorial, the focus is more on the software stack of DepthAI, so let’s get right into it!
DepthAI Software Stack
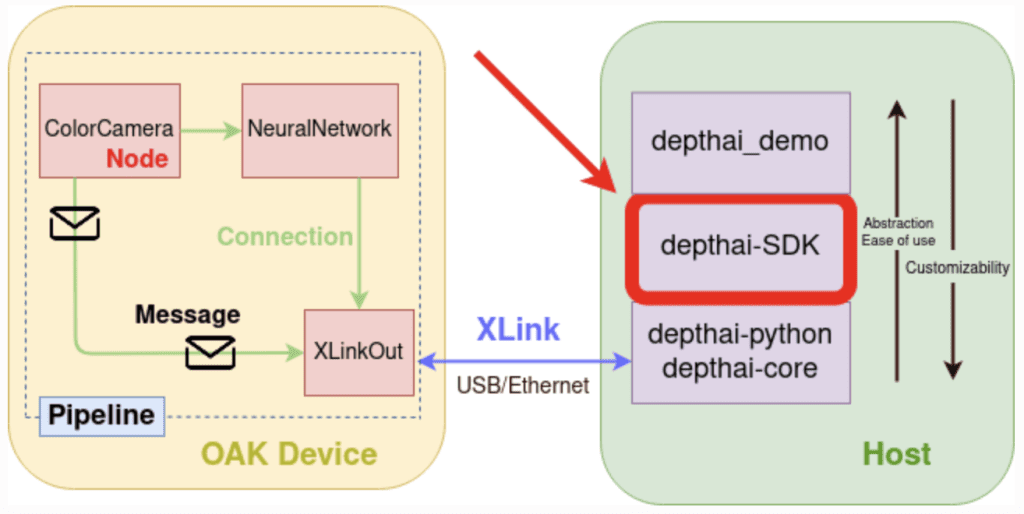
Like any other embedded hardware, OAK devices, too, need to be programmed to unleash their power and run applications on them. By now, we know OAK devices come with different variants: standalone, where the host resides on the OAK (e.g., CM), and normal OAK devices (e.g., OAK-D), which need to be connected with a host through a USB.
To program the OAK device via a host, one vertical software stack is offered in DepthAI (Figure 3), where the succeeding component acts as an abstraction over the preceding component:
- DepthAI API
- DepthAI SDK
- DepthAI Demo

DepthAI API
DepthAI API allows the host (e.g., a computer or any microprocessor) to connect, configure and communicate with the OAK devices with both Python API (depthai-python) and C++ API (depthai-core). The depthai-python library provides Python bindings for C++ depthai-core library. In today’s tutorial, we will focus on the Python API of DepthAI.
DepthAI API provides a programming model using the concept of a pipeline, which consists of nodes. Messages are sent from one node to another with links between them. Figure 3 above shows a high-level architecture of the connection between the host and OAK device, the software stack that DepthAI provides, and what goes inside the device.
Pipeline
It is a chain of processing elements, called nodes, and links between them, through which messages are sent from one node to another. As shown in Figure 3 above, Node A connects with Node B through which messages are exchanged (Node A sends a message to another node, XLinkOut).
Pipeline tells DepthAI what operations to perform, and you define all of the resources and workflows inside the pipeline. Whether you want to create a color camera, neural network, or XLinkOut for camera and neural network output, all of these are created as Nodes inside the pipeline.
This flow inside the pipeline provides users extensive flexibility for their OAK device. When the pipeline object is passed to the Device object, the pipeline gets serialized to JSON and sent to the OAK device via XLink.
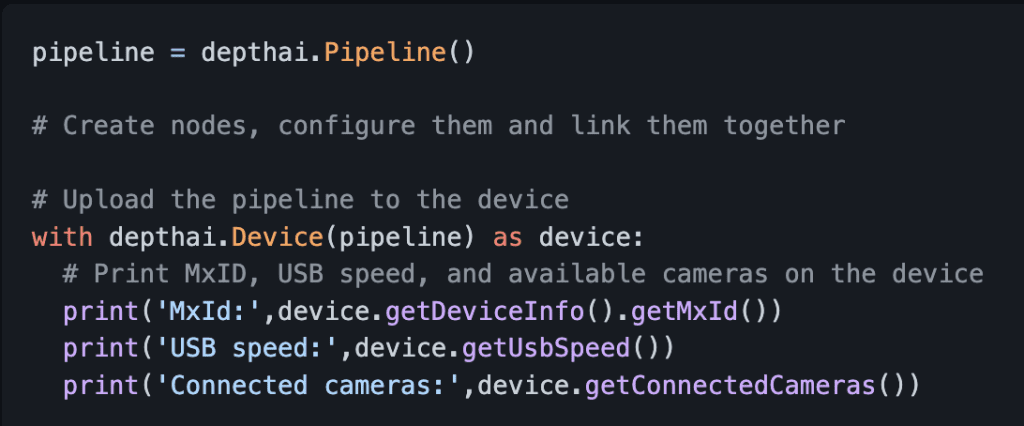
Creating a pipeline object is super simple. First, you need to call depthai.Pipeline(), as shown in Figure 4. Then you can use the pipeline object to populate it with nodes, configure them, and link them together.
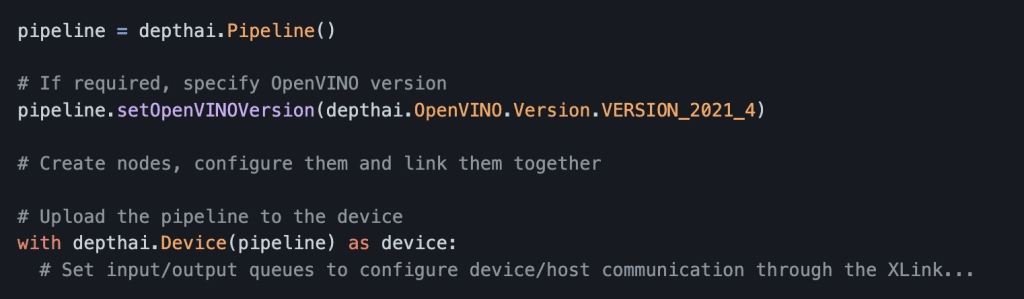
For example, as shown in Figure 4, using the pipeline object, you can specify the OpenVINO version to use with this pipeline. And the reason you need to change the version is that, let’s say, your Neural Network was compiled with a different version than the latest OpenVINO that DepthAI supports. So you have to specify the OpenVINO version of the pipeline.
Device API
Once the pipeline is created, you upload the pipeline to the device using the Device API, which gets executed on the Visual Processing Unit (VPU). When you create the device in the code, firmware is uploaded together with the pipeline and other assets (e.g., Neural Network blobs).
Intuitively it’s more like on the host; you define the pipeline inside which you create nodes, configure them and bind them, and finally move these to the OAK device (Figure 5). Then all the code that is written inside with depthai.Device(pipeline) as device: is directly performed on the device.
Connection
It is a link between one node’s output and another one’s input. To define the pipeline dataflow, the connections define where to send messages to achieve an expected result.
Messages
Messages are transferred between nodes, as defined by a connection. The only way nodes communicate with each other is by sending messages from one node to another node.
Messages can be created on both device and the host. For example, the OAK device Camera to capture still images receives a message through an XLinkIn node.
The following are a few of the messages that are defined in DepthAI:
CameraControl: This message controls the color and mono cameras. The message handles things like capturing still images, configuring autofocus, scenes, effects, etc.
EdgeDetectorConfig: This message configures theEdgeDetectornode for modifying the horizontal and vertical Sobel filter kernel.
ImageManipConfig: This message can be leveraged for resizing, warping, and rotating an image in runtime. The message is sent from the host to theColorCameranode over theXLinkInnode.
ImgDetections: It is indeed one of the most exciting messages that contains a list ofdetectionsin an image. As with most neural network detectors, thedetectionshaveclass label,confidence score, and thebounding box coordinates.
The detection nodes YoloDetectionNetwork and MobileNetDetectionNetwork output the ImgDetections message. We will discuss them in the node section.
ImgFrame: As the name suggests, this message carries RAW8 encoded frame data: Grayscale and RGB for Mono Camera and Color Camera, respectively. It also carries the depth/disparity image.ColorCameraandMonoCameranodes are the source of the image frame messages.
This can then be used for display purposes and, more importantly, as input to the Neural Network.
Node
The node is the most important building block of a Pipeline. It has inputs and outputs and has various configurable properties (e.g., setting resolution on the camera node, FPS, and frame output size). Each node can have zero, one, or multiple inputs and outputs. For example, Figure 6 shows a MobileNet Detection Network node that has one input and two outputs.

MobileNet Detection Network Node in DepthAI. A node can be connected (or linked) to other nodes. Figure 7 demonstrates an example of the ColorCamera node output linked to the input of a NeuralNetwork node. And the ColorCamera node sends an ImgFrame as input to the neural network. The input and output of nodes follow a queue mechanism that helps hold the messages depending on the queue size. And the queue size is a configurable parameter.

ColorCamera Node Output Linked to the NeuralNetwork Node Input.Let’s now go through a few examples of Node in DepthAI:
EdgeDetector
The edge detector node uses the Sobel filter to create an image that emphasizes the image regions that have a high spatial frequency. It convolves a 2D kernel of an odd size, like 3×3, and slides it over the entire image. Figure 8 shows an example of an EdgeDetector node with two inputs and one output.

EdgeDetector Node in DepthAI. The inputs and output each have a message type:
inputImage:ImgFrameinputConfig: EdgeDetectorConfigoutputImage:ImgFrame
XLink
XLink is a middleware that is capable of exchanging data between device and host. XLink is further split into XLinkIn and XLinkOut.
Figure 9 shows the XLinkIn node that sends data from the host to the device via XLink.

XLinkIn Node for sending data from host to device.Examples of XLinkIn nodes are
- Sending configuration to the device for image transformations such as crop, warp, rotate
- A color camera of the OAK device receives a message to capture a still image
- Controlling the ColorCamera parameters such as exposure, sensitivity, white balance, luma/chroma denoise, device-side crop, camera triggers, etc.
XLinkOut
It does the opposite of XLinkIn, sending data from the device to a host via XLink (as shown in Figure 10).

XLinkOut Node for sending data from device to host.Examples of XLinkOut nodes are
- Sending the OAK camera stream to host
- Neural network detection outputs to the host
These outputs can then be consumed by the user for display purposes.
NeuralNetwork
This node runs neural inference on input data (Figure 11). Any OpenVINO neural network can be run using this node, as long as the Vision Processing Unit (VPU) supports all layers. This allows you to pick from 200+ pre-trained models from OpenVINO’s Open Model Zoo repository and DepthAI Model Zoo repository and directly run it on the OAK device.

NeuralNetwork node for neural inference.The neural network file has to be in .blob format to be compatible with the VPU.
The input and output message type:
input:Any message typeout: NNDatapassthrough:ImgFrame
This is a more general NeuralNetwork node, so the input message is Any message type, which means you can pass something like audio series data or text data to the NeuralNetwork node.
MobileNetDetectionNetwork
MobileNetDetectionNetwork node is very similar to the NeuralNetwork node. The only difference is that this node is specifically for the MobileNet NeuralNetwork node, and it decodes the result of the NeuralNetwork node on the device. This means that the out of this node is not an NNData (a byte array) but an ImgDetections node can easily be used in your code for display purposes and many other post-processing operations.
Refer to Figure 6 above, which shows the MobileNetDetectionNetwork node. The input and output message types for the node are:
input:ImgFrameout: ImgDetectionspassthrough:ImgFrame
Unlike the NeuralNetwork node, the MobileNet detection network node has input as ImgFrame since these detection models (YOLO/SSD) are based on images and cannot accept any other data type.
YoloDetectionNetwork
Figure 12 shows the YoloDetectionNetwork node, which is very similar to the NeuralNetwork node. The only difference is that this node is specifically for the Tiny Yolo V3/V4 NeuralNetwork, which decodes the neural network’s result on the device. Like the MobileNetDetectionNetwork node, the YoloDetectionNetwork node returns ImgDetections.
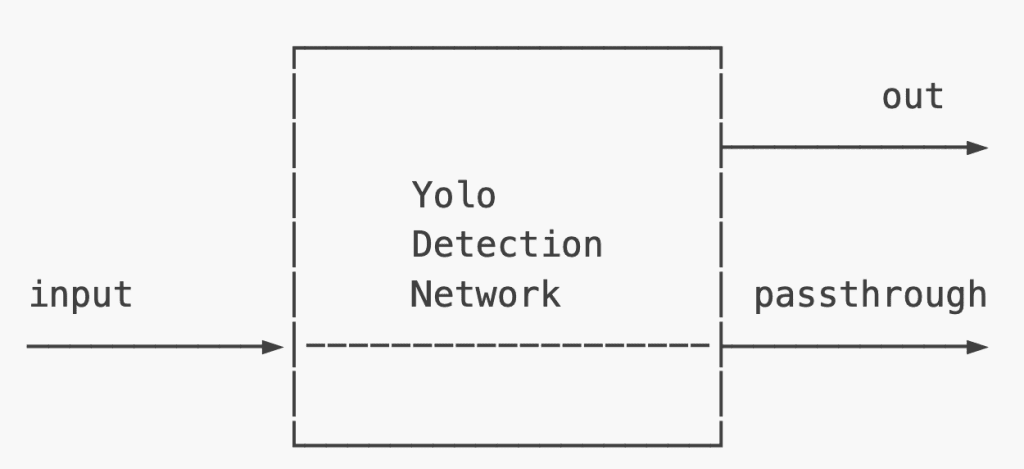
YoloDetectionNetwork node for detection (to run Tiny Yolo V3/V4 variants).The input and output message types for the above node are:
input:ImgFrameout: ImgDetectionspassthrough:ImgFrame
YoloSpatialDetectionNetwork
The YoloSpatialDetectionNetwork node works similarly to the YoloDetectionNetwork node (Figure 13). However, along with the detection results, it also outputs the spatial location of the bounding box using the SpatialImageDetections.
This network node mirrors the function of the SpatialLocatorCalculator node on top of the YoloDetectionNetwork node.
The SpatialLocatorCalculator node calculates the spatial coordinates of the ROI (Region-of-Interest) based on the depth map from the inputDepth. Then, it averages the depth values in the ROI and removes the ones out of range.
So, in short, it is a combination of the YoloDetectionNetwork and SpatialLocationCalculator nodes.

YoloSpatialDetectionNetwork node for spatial detection (to run Tiny Yolo V3/V4 variants).The input and output message types for the above node are:
input:ImgFrameinputDepth:ImgFramepassthrough:ImgFrameout:SpatialImageDetectionsboundingBoxMapping:SpatialLocationCalculatorConfigpassthroughDepth:ImgFrame
The SpatialImageDetections message is similar to the ImgDetections message, but along with the detections, it also includes the XYZ coordinates of the detected objects.
DepthAI SDK
DepthAI software development kit (SDK) is a wrapper over the DepthAI API. It is easy to use and provides more abstraction over the DepthAI but reduces the customizability factor. Similar to DepthAI API, the SDK is a Python package that contains convenience classes and functions that help in most common tasks using DepthAI API. Figure 14 shows a high-level architecture of the DepthAI SDK.
It consists of managers who handle different aspects of the development lifecycle:
- Pipeline Manager: Helps in setting up a processing pipeline
- Preview Manager: Helps in displaying images or video streams from the OAK cameras
- Neural Network Manager: Helps set up neural networks and handles all neural network-related functions. It can create appropriate
NeuralNetworknodes and connections and decode neural network output - Encoding Manager: Helps in creating videos from OAK cameras
- Blob Manager: Helps in downloading neural networks as MyriadX blobs, which the VPU requires to run neural network inference on the OAK device
We will not go into the details of each manager as it requires a separate post, and moreover, the examples we would be running in today’s tutorial use DepthAI API and not the SDK.
Understanding the DepthAI API Pipeline
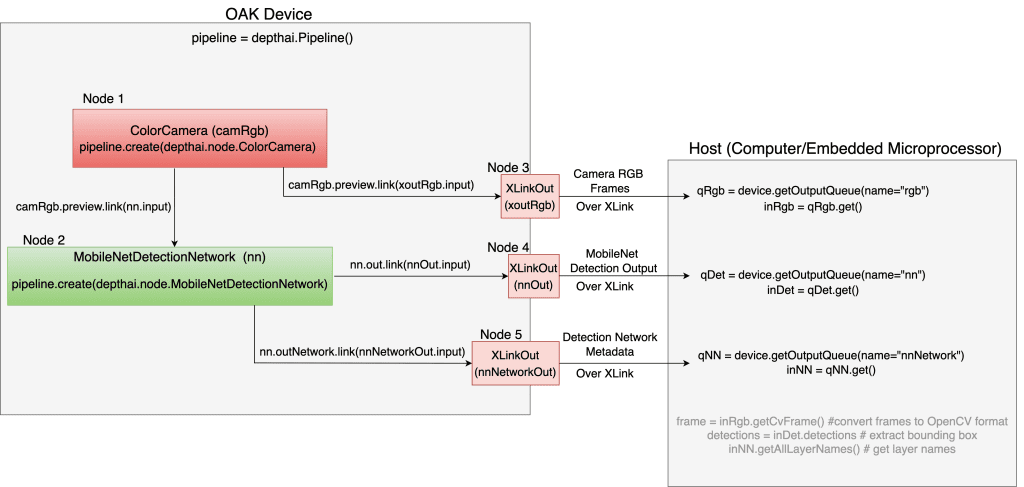
In this section, we will try to understand how the DepthAI API Pipeline works for a use case like Object Detection. Figure 15 shows the object detection workflow between the OAK device and the host (e.g., a computer/embedded hardware).
If you understand Figure 15 well, then understanding the code would be a cakewalk for you.
Device Side
Figure 15 above has five nodes: ColorCamera, MobileNetDetectionNetwork, and three XLinkOut nodes.
Recall from the above, in DepthAI, we mainly work with pipelines, and so on the device side, we first define the pipeline (depthai.Pipeline()).
Using that pipeline, we create a ColorCamera node (Node 1) shown in a medium-light shade of red. This node is like the stepping stone of our object detection pipeline as it would enable the OAK device color camera to capture image frames.
Similarly, we create the MobileNetDetectionNetwork node (Node 2), which would perform object detection on the frames received from Node 1. Finally, we link the camera output with the input of a NeuralNetwork node using the concept of linking and connections.
By calling camRgb.preview, you get the camera’s output, and then you link that with the input of the neural network with .link(nn.input). Isn’t that so simple?
Using the same analogy, you can send the camera output to the host side via the XLinkOut Node 3 (xoutRgb). The NeuralNetwork node also sends information to the host side via XLinkOut Node 4 and Node 5. This information includes the detection network outputs and network metadata like layer names.
Host Side
At the host side, we retrieve the camera frames and neural network inference output from the OAK device by setting up OutputQueue. As shown in Figure 15 above, the camera frames are sent to the host via XLink (or XLinkOut) and retrieved by the host using OutputQueue by passing a parameter rgb.
The inRgb on the host side refers to the frames from the camera. Similarly, for inference results and neural network metadata, the same process is followed, only this time, the parameter to the OutputQueue is nn and nnNetwork.
Once you have the camera frames and neural network results, you can post-process them on the host side. For example, annotating the image frames with the bounding box coordinates and object labels.
Figure 16 shows the pipeline graph of object detection generated by a tool that dynamically creates graphs of DepthAI pipelines. This tool is very useful in getting high-level insight into DepthAI programs without directly reading the code.
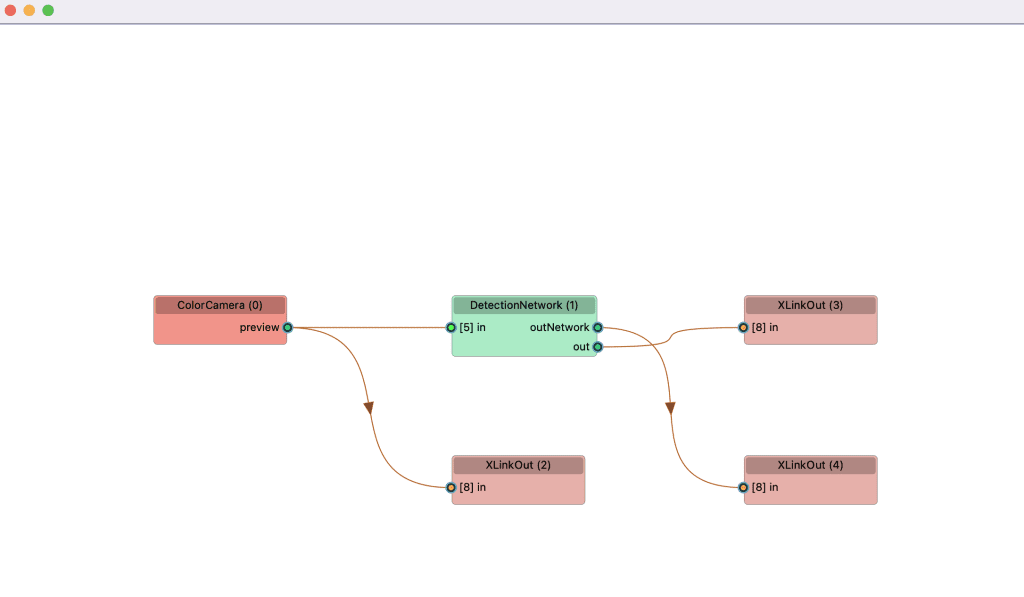
Below you can see each node id of the above pipeline graph and how they are connected to every other node in the object detection pipeline.
Nodes (id):
===========
ColorCamera (0)
DetectionNetwork (1)
XLinkOut (2)
XLinkOut (3)
XLinkOut (4)
Connections:
============
0 DetectionNetwork (1): outNetwork → XLinkOut (4): [8] in
1 DetectionNetwork (1): out → XLinkOut (3): [8] in
2 ColorCamera (0): preview → DetectionNetwork (1): [5] in
3 ColorCamera (0): preview → XLinkOut (2): [8] in
Enough of theory, right? Let’s now put this theoretical knowledge into practice and run some DepthAI examples from the Luxonis GitHub repository on the OAK-D device.
OAK Demo Examples
In this section, we will be going through a few DepthAI examples using the OAK with Depth hardware, namely:
- Testing the color camera feed with OAK-D
- Running the mono cameras (left and right) of OAK-D
- Object Detection with MobileNet model
Configuring the Prerequisites
Before we start our implementation, let’s go over the configuration pipeline of our project. We will move on to the config.py script located in the pyimagesearch directory.
# Set the color camera preview size and interleaved
COLOR_CAMERA_PREVIEW_SIZE = 300, 300
CAMERA_INTERLEAVED = False
CAMERA_FPS = 40

# Queue parameters for rgb and mono camera frames at host side
COLOR_CAMERA_QUEUE_SIZE = 4
QUEUE_BLOCKING = False

# Object detection class labels
CLASS_LABELS = ["background", "aeroplane", "bicycle", "bird", "boat",
               "bottle", "bus", "car", "cat", "chair", "cow",
               "diningtable", "dog", "horse", "motorbike", "person",
               "pottedplant", "sheep", "sofa", "train", "tvmonitor"]
MOBILENET_DETECTION_MODEL_PATH = 'models/mobilenet-ssd_openvino_2021.' \
                                '4_6shave.blob'


# Neural network hyperparameters
NN_THRESHOLD = 0.5
INFERENCE_THREADS = 2
PRINT_NEURAL_NETWORK_METADATA = True

# Frame text color pattern
TEXT_COLOR = (255, 0, 0)
TEXT_COLOR2 = (255, 255, 255)
From Lines 2-4, we set the camera parameters like the preview size of the frame (the display window size on the host side), the camera FPS, and the camera to interleave or planar option.
We then set the OutputQueue parameters for rgb and mono cameras, like queue size and whether to have a blocking or non-blocking queue (Lines 7 and 8).
On Lines 11-16, we define the object detection parameters like the class labels of the Pascal-VOC dataset and mobilenet detection model path.
Then we define the object detection confidence threshold number of inference threads. These are the neural network hyperparameters specific to the object detection model on Lines 20-22.
The final step of the configuration pipeline is setting the OpenCV-related text color pattern, which would be consumed for annotating the output frames on the host side (Lines 25 and 26).
Testing the Color Camera (RGB) Feed of OAK-D
Now that the configuration pipeline has been defined, we can move to the code walkthrough of our first experiment (i.e., running the RGB color camera of OAK-D). This experiment would help you to learn how the color camera node is created and how the camera feed is then displayed on the host side via the XLinkOut node.
# import the necessary packages
import cv2
import depthai as dai

from pyimagesearch import config


def create_color_camera_pipeline():
   # Create pipeline
   pipeline = dai.Pipeline()

   # Define source and output
   # camera node
   camRgb = pipeline.create(dai.node.ColorCamera)
   # XLinkOut node for displaying frames
   xoutRgb = pipeline.create(dai.node.XLinkOut)

   # set stream name as rgb
   xoutRgb.setStreamName('rgb')

   # set camera properties like the preview window, interleaved
   camRgb.setPreviewSize(config.COLOR_CAMERA_PREVIEW_SIZE)
   camRgb.setInterleaved(config.CAMERA_INTERLEAVED)
   camRgb.setColorOrder(dai.ColorCameraProperties.ColorOrder.RGB)

   # link the camera preview to XLinkOut node input
   camRgb.preview.link(xoutRgb.input)

   # return pipeline to the calling function
   return pipeline
We start by importing the required packages like cv2, depthai, and config from the pyimagesearch module on Lines 2-5.
Then, on Lines 8-30, we define the create_color_camera_pipeline() method, which would build the color camera pipeline. We first create the pipeline object (Line 10), then define the source, i.e., the color camera node and the output (XLinkOut) node for displaying the color frames (Lines 14-16).
Then, on Line 19, the XLinkOut node (i.e., xoutRgb variable) is given a stream name as rgb; this name would be passed as a parameter to the OutputQueue for fetching the color frames.
From Lines 22-24, we set the camera properties/parameters like the display window size, color channel order, and camera interleave.
The next step is to link the camRgb output with the input of xoutRgb (the XLinkOut node) on Line 27.
On Line 30, we return the pipeline to the calling function.
def color_camera(pipeline):
   # Connect to device and start pipeline
   with dai.Device(pipeline) as device:
       print('Connected cameras: ', device.getConnectedCameras())
       # Print out usb speed like low/high
       print('Usb speed: ', device.getUsbSpeed().name)

       # Output queue will be used to get the rgb
       # frames from the output defined above
       qRgb = device.getOutputQueue(
           name='rgb',
           maxSize=config.COLOR_CAMERA_QUEUE_SIZE,
           blocking=config.QUEUE_BLOCKING,
       )

       while True:
           # blocking call, will wait until a new data has arrived
           inRgb = qRgb.get()
           # Convert the rgb frame data to OpenCV format and
           # display 'bgr' (opencv format) frame
           cv2.imshow('rgb', inRgb.getCvFrame())

           # break out from the while loop if 'q' key is pressed
           if cv2.waitKey(1) == ord('q'):
               break
On Line 33, we define the color_camera method, which takes the pipeline as a parameter. Then we connect to the OAK device and start the pipeline on Line 35. Finally, we print additional information like connected cameras and USB speed like low/high over which the host & device communicate (on Lines 36-38).
Next, on Lines 42-46, the OutputQueue is defined, which accepts the parameters: the stream name, camera queue size, and queue blocking. This queue helps fetch the color camera frames from the output.
Finally, now that most of the heavy lifting is done, on Line 48, an infinite while loop is defined, which keeps running until the q key is pressed (Line 56). Within the while loop on Line 50, we use the queue object qRgb to fetch the actual frame, which is then converted into OpenCV bgr format and displayed on the host screen using the cv2.imshow function (Line 53).
Testing the Mono Cameras (Left and Right) Feed of OAK-D
The following experiment is learning how to access the Mono cameras (left and right) of OAK-D and display the feed on the host side. This would be much easier to understand, given that you have followed the previous experiment. Here we would create two camera nodes and two XLinkOut nodes for displaying the mono camera feed.
# import the necessary packages
from pyimagesearch import config
import depthai as dai
import cv2

def create_mono_camera_pipeline():
    # create pipeline
    pipeline = dai.Pipeline()

    # define sources and outputs: creating left and right camera nodes
    monoLeft = pipeline.create(dai.node.MonoCamera)
    monoRight = pipeline.create(dai.node.MonoCamera)

    # XLinkOut nodes for displaying frames from left and right camera
    xoutLeft = pipeline.create(dai.node.XLinkOut)
    xoutRight = pipeline.create(dai.node.XLinkOut)

    # set XLinkOut stream name as left and right for later using in
    # OutputQueue
    xoutLeft.setStreamName('left')
    xoutRight.setStreamName('right')

    # set mono camera properties like which camera socket to use,
    # camera resolution
    monoLeft.setBoardSocket(dai.CameraBoardSocket.LEFT)
    monoLeft.setResolution(
        dai.MonoCameraProperties.SensorResolution.THE_720_P)
    monoRight.setBoardSocket(dai.CameraBoardSocket.RIGHT)
    monoRight.setResolution(
        dai.MonoCameraProperties.SensorResolution.THE_720_P,
    )

    # link the left and right camera output to XLinkOut node input
    monoRight.out.link(xoutRight.input)
    monoLeft.out.link(xoutLeft.input)

    # return pipeline to the calling function
    return pipeline
We start by importing the required packages like cv2, depthai, and config from the pyimagesearch module on Lines 2-4.
Then, on Lines 6-31, we define the create_mono_camera_pipeline() method, which would build the camera pipeline for both left and right cameras. We first create the pipeline object (Line 8), then define the source and output (Lines 11 and 12). This time we create two camera nodes: left and right, and two XLinkOut nodes for displaying the left and right camera feeds.
On Lines 15 and 16, the two XLinkOut nodes (i.e., xoutLeft and xoutRight variables) are given a stream name as left and right; this name would be passed as a parameter to the two different OutputQueue for fetching the color frames.
From Lines 25-31, we set the camera properties/parameters for both cameras (e.g., the camera socket and camera resolution).
The next step is to link the left and right camera outputs with the input of xoutLeft and xoutRight (the two XLinkOut nodes) on Lines 34 and 35.
On Line 38, we return the pipeline to the calling function.
def mono_cameras_preview(pipeline):
    # connect to device and start pipeline
    with dai.Device(pipeline) as device:
        # output queues will be used to get the grayscale
        # frames from the outputs defined above
        qLeft = device.getOutputQueue(
            name='left',
            maxSize=config.COLOR_CAMERA_QUEUE_SIZE,
            blocking=config.QUEUE_BLOCKING,
        )
        qRight = device.getOutputQueue(
            name='right',
            maxSize=config.COLOR_CAMERA_QUEUE_SIZE,
            blocking=config.QUEUE_BLOCKING,
        )

        while True:
            # instead of get (blocking), we use tryGet (non-blocking)
            # which will return the available data or None otherwise
            inLeft = qLeft.tryGet()
            inRight = qRight.tryGet()

            # check if data is available from left camera node
            if inLeft is not None:
                # convert the left camera frame data to OpenCV format and
                # display grayscale (opencv format) frame
                cv2.imshow('left', inLeft.getCvFrame())

            # check if data is available from right camera node
            if inRight is not None:
                # convert the right camera frame data to OpenCV format and
                # display grayscale (opencv format) frame
                cv2.imshow('right', inRight.getCvFrame())

            # break out from the while loop if 'q' key is pressed
            if cv2.waitKey(1) == ord('q'):
                break
On Line 41, we define the mono_cameras_preview method, which takes the pipeline as a parameter. Then we connect to the OAK device and start the pipeline on Line 43.
Next, from Lines 46-55, two OutputQueue are defined, which accept the parameters: the stream names (left and right), camera queue size, and queue blocking. These queues help fetch both left and right (grayscale) camera frames from the output.
On Line 57, an infinite while loop is defined, which keeps running until the q key is pressed (Line 76). Within the while loop on Lines 60 and 61, we use the queue object qLeft and qRight to fetch the frame data. Notice that we use the tryGet() method instead of get() in the color camera example. This is because the tryGet() method is a non-blocking call that would return the data or none if there are no frames in the queue. Please try the get() method and see if you find any difference.
Finally, if the left and right frames are not None, then frame data are converted into OpenCV grayscale format and displayed on the host screen using the cv2.imshow function (Lines 64-73).
Object Detection with MobileNet Model Pretrained on Pascal-VOC Dataset
Now that we know how to create a pipeline, camera node, XLinkOut node, OutputQueue, etc., we can combine this knowledge and create an object detection application that detects common objects in an image.
We would use the MobileNet-SSD model: a single-shot multi-box detection (SSD) network intended to perform object detection. This model was originally implemented in the Caffe framework. To get more insight into the MobileNet-SSD model, check out the repository.
Before we walk through the object detection code, let’s review the utilities for the object detection pipeline. For that, we will move on to the utils.py script located in the pyimagesearch directory.
# import the necessary packages
from pyimagesearch import config
import numpy as np
import cv2

# color pattern for annotating frame with object category, bounding box,
# detection confidence
color = config.TEXT_COLOR

# MobilenetSSD label list
labelMap = config.CLASS_LABELS

# nn data (bounding box locations) are in <0..1>
# range - they need to be normalized with frame width/height
def frameNorm(frame, bbox):
    normVals = np.full(len(bbox), frame.shape[0])
    normVals[::2] = frame.shape[1]
    return (np.clip(np.array(bbox), 0, 1) * normVals).astype(int)


# displayFrame method iterates over the detections of a frame,
# denormalizes the bounding box coordinates and annotates the frame with
# class label, detection confidence, bounding box
def displayFrame(name, frame, detections):
    for detection in detections:
        bbox = frameNorm(
            frame, (
                detection.xmin, detection.ymin,
                detection.xmax, detection.ymax,
            ),
        )
        cv2.putText(
            frame, labelMap[detection.label], (
                bbox[0] + 10,
                bbox[1] + 20,
            ),
            cv2.FONT_HERSHEY_TRIPLEX, 0.5, color,
        )
        cv2.putText(
            frame, f'{int(detection.confidence * 100)}%',
            (bbox[0] + 10, bbox[1] + 40), cv2.FONT_HERSHEY_TRIPLEX,
            0.5, color,
        )
        cv2.rectangle(frame, (bbox[0], bbox[1]), (bbox[2], bbox[3]),
            color, 2)

    # show the frame
    cv2.imshow(name, frame)

# method that prints the detection network output layer name
def print_neural_network_layer_names(inNN):
    toPrint = 'Output layer names:'
    for ten in inNN.getAllLayerNames():
        toPrint = f'{toPrint} {ten},'print(toPrint)
On Lines 2-4, we import the necessary packages like opencv, numpy, etc.
Then we define the color pattern for annotating the frame with the class label, confidence score, and bounding box. The class label list labelMap is defined on Line 11, which would help convert the class ids to a human-readable form.
Since the neural network predictions (bounding box coordinates) are normalized in the range [0, 1], they need to be denormalized with the image frame width and height. The frameNorm method helps accomplish this task on Lines 15-18.
On Lines 24-48, we define the displayFrame method, which iterates over each detection of a frame, denormalizes the bounding box coordinates using the frameNorm method, and annotates the frame with the class label, detection confidence, and bounding box coordinates. Finally, it displays the annotated frame on the host side.
Finally, on Lines 51-54, print_neural_network_layer_names helps print the object detection network layer names.
Now with the helper methods defined, we can finally move to the object detection inference implementation (i.e., the object_detection_mobilenet.py script located in the pyimagesearch directory).
# import the necessary packages
from pyimagesearch import config
from pyimagesearch.utils import print_neural_network_layer_names
from pyimagesearch.utils import displayFrame
import depthai as dai
import time
import cv2

def create_detection_pipeline():
    # create pipeline
    pipeline = dai.Pipeline()

    # define camera node
    camRgb = pipeline.create(dai.node.ColorCamera)

    # define the MobileNetDetectionNetwork node
    nn = pipeline.create(dai.node.MobileNetDetectionNetwork)

    # define three XLinkOut nodes for RGB frames, Neural network detections
    # and Neural network metadata for sending to host
    xoutRgb = pipeline.create(dai.node.XLinkOut)
    nnOut = pipeline.create(dai.node.XLinkOut)
    nnNetworkOut = pipeline.create(dai.node.XLinkOut)

    # set the XLinkOut node names
    xoutRgb.setStreamName('rgb')
    nnOut.setStreamName('nn')
    nnNetworkOut.setStreamName('nnNetwork')

    # set camera properties like the preview window, interleaved and
    # camera FPS
    camRgb.setPreviewSize(config.COLOR_CAMERA_PREVIEW_SIZE)
    camRgb.setInterleaved(config.CAMERA_INTERLEAVED)
    camRgb.setFps(config.CAMERA_FPS)

    # define neural network hyperparameters like confidence threshold,
    # number of inference threads. The NN will make predictions
    # based on the source frames
    nn.setConfidenceThreshold(config.NN_THRESHOLD)
    nn.setNumInferenceThreads(config.INFERENCE_THREADS)

    # set mobilenet detection model blob path
    nn.setBlobPath(config.MOBILENET_DETECTION_MODEL_PATH)
    nn.input.setBlocking(False)

    # link the camera preview to XLinkOut node input
    camRgb.preview.link(xoutRgb.input)

    # camera frames linked to NN input node
    camRgb.preview.link(nn.input)

    # NN out (image detections) linked to XLinkOut node
    nn.out.link(nnOut.input)

    # NN unparsed inference results  (metadata) linked to XLinkOut node
    nn.outNetwork.link(nnNetworkOut.input)

    # return pipeline to the calling function
    return pipeline
We start by importing the required packages like the time module for computing FPS, cv2 for displaying frames and other image utilities, the config module, and utilities that we defined above, like the displayFrame method on Lines 2-7.
On Lines 9-59, we define the create_detection_pipeline() method, which would set the base for the object detection experiment. We start by creating the pipeline on Line 11. Then from Lines 14-23, we create the sources and outputs. First, we create the ColorCamera node, the most important node (i.e., the MobileNetDetectionNetwork node), which would perform the Neural Network inference and decode the predictions on the device.
Three XLinkOut nodes are created for RGB frames, neural network detections, and neural network metadata. All of this information would be sent to the host.
Then, a stream name is assigned to all three XLinkOut nodes, namely rgb, nn, and nnNetwork; these would be used for retrieving the data from OutputQueue later (on Lines 26-28).
From Lines 32-34, camera parameters are set (e.g., preview window size and camera FPS).
Then, we define the neural network hyperparameters on Lines 39-44 (e.g., the detection confidence threshold, the number of inference threads, and model file path, etc.).
The last step is to link the input and output nodes (Lines 47-56):
- The color camera output is linked to the input of the
XLinkOutnode. - The camera output is linked to the input of a
NeuralNetworknode for performing predictions. - The neural network output is linked to the input of another
XLinkOutnode, and this node would output the object detection predictions. - Finally, the node responsible for carrying the neural network unparsed inference results (metadata) is linked to the
nnNetworknode.
The pipeline object is then returned to the calling function on Line 59.
def object_detection_mobilenet(pipeline):
    # connect to device and start pipeline
    with dai.Device(pipeline) as device:
        # output queues will be used to get the rgb frames
        # and nn data from the outputs defined above
        qRgb = device.getOutputQueue(
            name='rgb',
            maxSize=config.COLOR_CAMERA_QUEUE_SIZE,
            blocking=config.QUEUE_BLOCKING,
        )
        qDet = device.getOutputQueue(
            name='nn',
            maxSize=config.COLOR_CAMERA_QUEUE_SIZE,
            blocking=config.QUEUE_BLOCKING,
        )
        qNN = device.getOutputQueue(
            name='nnNetwork',
            maxSize=config.COLOR_CAMERA_QUEUE_SIZE,
            blocking=config.QUEUE_BLOCKING,
        )

        # initialize frame, detections list, and startTime for
        # computing FPS
        frame = None
        detections = []
        startTime = time.monotonic()
        counter = 0

        # color pattern for displaying FPS
        color2 = config.TEXT_COLOR2

        # boolean variable for printing NN layer names on console
        printOutputLayersOnce = config.PRINT_NEURAL_NETWORK_METADATA

        while True:
            # instead of get (blocking), we use tryGet (non-blocking)
            # which will return the available data or None otherwise
            # grab the camera frames, image detections, and NN
            # metadata
            inRgb = qRgb.tryGet()
            inDet = qDet.tryGet()
            inNN = qNN.tryGet()

            # check if we frame is available from the camera
            if inRgb is not None:
                # convert the camera frame to OpenCV format
                frame = inRgb.getCvFrame()

                # annotate the frame with FPS information
                cv2.putText(
                    frame, 'NN fps: {:.2f}'.
                    format(counter / (time.monotonic() - startTime)),
                    (2, frame.shape[0] - 4),
                    cv2.FONT_HERSHEY_TRIPLEX, 0.4, color2,
                )

            # check if detections are available
            if inDet is not None:
                # fetch detections & increment the counter for FPS computation
                detections = inDet.detections
                counter += 1

            # check if the flag is set and NN metadata is available
            if printOutputLayersOnce and inNN is not None:
                # call the `neural network layer names method and pass
                # inNN queue object which would help extract layer names
                print_neural_network_layer_names(inNN)
                printOutputLayersOnce = False

            # if the frame is available, draw bounding boxes on it
            # and show the frame
            if frame is not None:
                displayFrame('object_detection', frame, detections)

            # break out from the while loop if 'q' key is pressed
            if cv2.waitKey(1) == ord('q'):
                break
Now that the pipeline is created, we can start fetching the frames and neural network predictions. On Lines 62-138, the object_detection_mobilenet() method is defined that takes the pipeline as a parameter. We then connect to the device and start the pipeline on Line 64.
From Lines 67-81, three output queues are defined, namely the rgb, nn, and nnNetwork to get the RGB frames and neural network data. Next, we initialize the frame variable, detections list, and startTime for computing the FPS (Lines 85-87). We also define a boolean variable called printOutputLayersOnce for printing neural network layer names on the console.
On Line 96, we start an infinite while loop.
Inside the loop, we first fetch the camera frames, image detections, and network metadata using the three OutputQueue defined above (Lines 101-103).
On Line 106, we check if the camera frames are not None. Then, we convert them to OpenCV format and annotate the frame with FPS information (Lines 108-116).
Then, if the current frame has any detections, we extract the detections and increment the counter for FPS computation on Lines 119-122.
Next, we print the network layer names. If the boolean variable is set to True, call displayFrame to annotate the frame and display the output on the screen (Lines 128-134).
Finally, we break out of the loop if the q key is pressed on Lines 137 and 138.
Results
Let’s now look at the results of all three experiments (see Figures 17-19).
- Color Camera Preview

- Left and Right Mono Camera Feed

- Object Detection with MobileNet Model

What's next? I recommend PyImageSearch University.
60+ total classes • 64+ hours of on-demand code walkthrough videos • Last updated: Dec 2022
★★★★★ 4.84 (128 Ratings) • 15,800+ Students Enrolled
I strongly believe that if you had the right teacher you could master computer vision and deep learning.
Do you think learning computer vision and deep learning has to be time-consuming, overwhelming, and complicated? Or has to involve complex mathematics and equations? Or requires a degree in computer science?
That’s not the case.
All you need to master computer vision and deep learning is for someone to explain things to you in simple, intuitive terms. And that’s exactly what I do. My mission is to change education and how complex Artificial Intelligence topics are taught.
If you're serious about learning computer vision, your next stop should be PyImageSearch University, the most comprehensive computer vision, deep learning, and OpenCV course online today. Here you’ll learn how to successfully and confidently apply computer vision to your work, research, and projects. Join me in computer vision mastery.
Inside PyImageSearch University you'll find:
- ✓ 60+ courses on essential computer vision, deep learning, and OpenCV topics
- ✓ 60+ Certificates of Completion
- ✓ 64+ hours of on-demand video
- ✓ Brand new courses released regularly, ensuring you can keep up with state-of-the-art techniques
- ✓ Pre-configured Jupyter Notebooks in Google Colab
- ✓ Run all code examples in your web browser — works on Windows, macOS, and Linux (no dev environment configuration required!)
- ✓ Access to centralized code repos for all 500+ tutorials on PyImageSearch
- ✓ Easy one-click downloads for code, datasets, pre-trained models, etc.
- ✓ Access on mobile, laptop, desktop, etc.
Summary
In this tutorial, we learned the concepts of the DepthAI software stack and leveraged it to run a few applications of Deep Learning and Computer Vision on the OAK-D device.
Specifically, we discussed the DepthAI API, in which we learned the concept of pipelines, messages, and nodes. We then discussed a few types of nodes (e.g., XLink, NeuralNetwork, EdgeDetector, YoloDetectionNetwork, etc.).
We also discussed the DepthAI SDK, a wrapper on top of DepthAI API. But, more importantly, we discussed the end-to-end DepthAI pipeline for an object detection use case.
We further delved into the OAK demo examples. In addition, we leveraged the DepthAI API to code three examples in Python: running color camera feed, mono camera feed, and object detection on OAK-D.
Finally, we briefly examined the results of the three experiments we performed with OAK-D.
Citation Information
Sharma, A. “OAK-D: Understanding and Running Neural Network Inference with DepthAI API,” PyImageSearch, P. Chugh, A. R. Gosthipaty, S. Huot, K. Kidriavsteva, R. Raha, and A. Thanki, eds., 2022, https://pyimg.co/8ynbk
@incollection{Sharma_2022_OAK-D,
  author = {Aditya Sharma},
  title = {{OAK-D}: Understanding and Running Neural Network Inference with {DepthAI} {API}},
  booktitle = {PyImageSearch},
  editor = {Puneet Chugh and Aritra Roy Gosthipaty and Susan Huot and Kseniia Kidriavsteva and Ritwik Raha and Abhishek Thanki},
  year = {2022},
  note = {https://pyimg.co/8ynbk},
}
Want free GPU credits to train models?
- We used Jarvislabs.ai, a GPU cloud, for all the experiments.
- We are proud to offer PyImageSearch University students $20 worth of Jarvislabs.ai GPU cloud credits. Join PyImageSearch University and claim your $20 credit here.
In Deep Learning, we need to train Neural Networks. These Neural Networks can be trained on a CPU but take a lot of time. Moreover, sometimes these networks do not even fit (run) on a CPU.
To overcome this problem, we use GPUs. The problem is these GPUs are expensive and become outdated quickly.
GPUs are great because they take your Neural Network and train it quickly. The problem is that GPUs are expensive, so you don’t want to buy one and use it only occasionally. Cloud GPUs let you use a GPU and only pay for the time you are running the GPU. It’s a brilliant idea that saves you money.
JarvisLabs provides the best-in-class GPUs, and PyImageSearch University students get between 10-50 hours on a world-class GPU (time depends on the specific GPU you select).
This gives you a chance to test-drive a monstrously powerful GPU on any of our tutorials in a jiffy. So join PyImageSearch University today and try it for yourself.
To download the source code to this post (and be notified when future tutorials are published here on PyImageSearch), simply enter your email address in the form below!
Download the Source Code and FREE 17-page Resource Guide
Enter your email address below to get a .zip of the code and a FREE 17-page Resource Guide on Computer Vision, OpenCV, and Deep Learning. Inside you'll find my hand-picked tutorials, books, courses, and libraries to help you master CV and DL!
The post OAK-D: Understanding and Running Neural Network Inference with DepthAI API appeared first on PyImageSearch.